I want to jump right in and get straight to the point. How to buy a domain name and hosting for your WordPress site. Some of the posts in this series have been pretty long. For this reason, I’m going to cover how to buy a domain name and web host in 2 separate parts.
The first part is going to be step by step instructions without any explanation as to why. It’s just exactly what to do, who I would pick and how to go about setting things up. In the second part, I will cover the why and alternatives you might consider.
Step 1: Purchase a Domain with Namecheap.com
Go to Namecheap.com, use the search box to find your domain. Add to Cart, don’t worry about the frequently bought together add-ons.
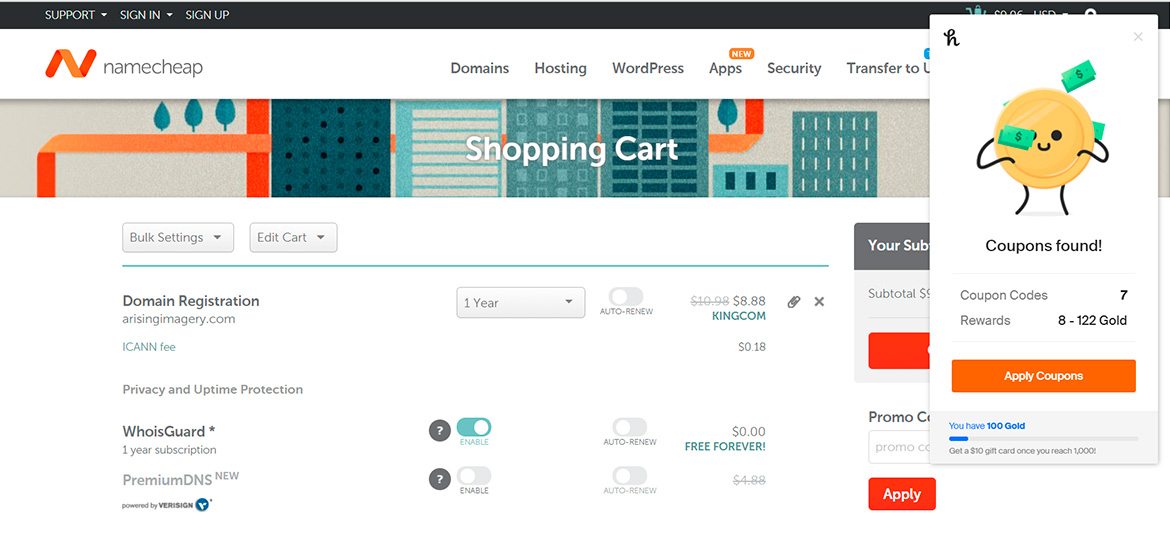
View Cart, 1 year is fine for now but feel free to choose more if you wish. Keep WHOIS guard enabled, it’s free and will protect your privacy. Don’t worry about premium DNS right now.
If you have honey installed on your browser you can check for coupons now. If not you can search google for possible Namecheap coupons to save money.
Confirm Order, at this point you will be prompted to either login or create an account. Once logged in you simply review the order and complete the transaction. Congratulations, you now own the domain.
Amazing WordPress Recommendations
| SiteGround | WordPress Recommended Host |
| NameCheap | Recommended Domain Registrar |
| WP Rocket | The One Plugin I Purchased – Speed Matters! |
| Online WordPress Classes | CreativeLive WordPress Training Classes |

Step 2: Purchase Hosting for your new Domain with SiteGround.com
Go to SiteGround.com. Select Managed WordPress Hosting. I prefer you go with the Grow Big plan. Grow Big includes unlimited websites, 20GB of webspace vs 10GB, advanced SuperCacher to boost the speed of your pages loads and free backup restore.
These are really nice features to have but if you are pressed for cash you can choose the Start-Up package. You will only be able to have 1 website and lose the features I listed above.
Once you select your plan it will ask you to either register a domain or input one you already own. Select “I already have a domain” and input the one you purchased in step 1.
You are now on the Review and Complete tab where they want you to fill out your information to create an account. Hover over the little red X on your browser like you’re going to close the window. A flash deal will likely pop up, grab that. It may or may not be different from the current price.

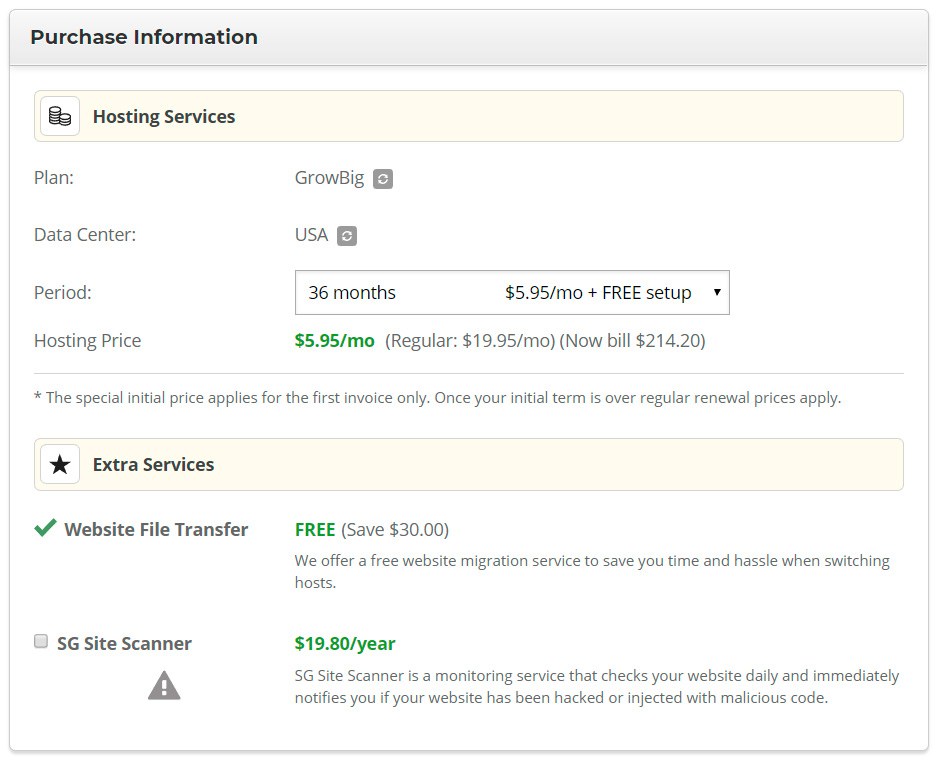
Fill out all the pertinent information to create your account. Under period, I HIGHLY suggest you buy 36 months. You’re not going to see this type of starter deal again and a year goes by quick, trust me. Lock in the deal for 3 years and be done with it!
You can skip the SG Site Scanner if you’re trying to save money. If money is no issue then go ahead and grab it as it’s not a bad service to have.

Agree to the terms and privacy policy, decide if you want their newsletter and pay. You will likely get the following emails.
Sales Receipt email – includes order and billing details.
Important Information About Your New Hosting Account – Includes your username, a link to the user area, info about setting up a website, and DNS settings.
Congratulations, you now have Hosting with SiteGround.
How to Buy a Domain Name and Hosting In Depth
Here, I explain why NameCheap and Siteground. I also offer you some alternative domain registrars and hosting options.
In your mission to learn how to buy a domain name and hosting you may have noticed something. Yes, you can purchase a domain name from the same place you buy hosting. It seems convenient but I don’t recommend this. I prefer to buy hosting from a domain registrar and hosting from a hosting provider. Sometimes, a place will offer both but that doesn’t mean they are good at both.
Besides, there are significant advantages of keeping your domain registrar separate from your hosting account as well. Let’s look at those.
Why You Shouldn’t Register Domains With Your Web Host
Additional Security
If someone is able to hijack your website it’s not going to be good. It’s going to be worse if they have access to your domains as well. Not only can they wreak havoc on your website but they can completely transfer your domains away from your web host. If your domains are located elsewhere at least they will be safe assuming you are using different login/password credentials.
Easy management
I have jumped host providers quite a bit, mostly to save money when renewal time comes around. If every time I switched hosts I had to transfer my domains to the new host then life would be really difficult. By having all my domains reside at my one favorite domain registrar I never have to move them. I just update the DNS settings to point to my new host and I’m done.
Why Choose Namecheap.com to Register my Domains?
I transferred all my domains from Godaddy to Namecheap sometime ago and never looked back. Let’s look at the benefits of using Namecheap.com to register your domains.
Excellent Customer Service
First, the customer service is excellent with a knowledgebase of frequently encountered issues, 24/7 live chat and a support ticket system. At this time they do not offer phone support. I’ve used the ticket system a few times with great results.
Competitive Pricing
Second, Namecheap has very competitive prices and you can usually find an online coupon for even further savings.
Great Domain Search Features
Third, I love their domain search features. It’s really helpful in suggesting alternatives if the one you’ve entered is taken. Click “beast mode” and you can further your search efforts with domain hacks, drop last vowel, and pluralized nouns.
Free WHOISGuard for life to Protect your Privacy
Last, and most importantly they offer FREE WHOISGuard for life. That’s huge because I’ve seen other registrars charge as much as $12 dollars a year for similar privacy services. That adds up if you have multiple domains. Trust me, unless you want even more SPAM in your life, you need this!
I registered for a free domain offer with another registrar once and made the mistake of not acquiring privacy protection. The result was my contact information was listed publicly with iCANN. I’m talking, phone number, home address, email, etc.
Immediately, I was bombarded with Spam calls, emails from people wanting to develop my new website. It was crazy! I couldn’t believe it to be honest. This service alone makes Namecheap my favorite Domain Registrar.
Popular Alternatives you might research: Domain.com, GoDaddy.com, Bluehost.com, and Hostgator.com
Why Choose SiteGround.com to Host my Website?
So I’ve tried Bluehost, GoDaddy, HostGator, and SiteGround. So far, SiteGround has been my favorite. WordPress actually recommends SiteGround, Bluehost or DreamHost. Mostly, because these providers offer tools that are very WordPress Friendly.
SiteGround is Popular with the WordPress Community
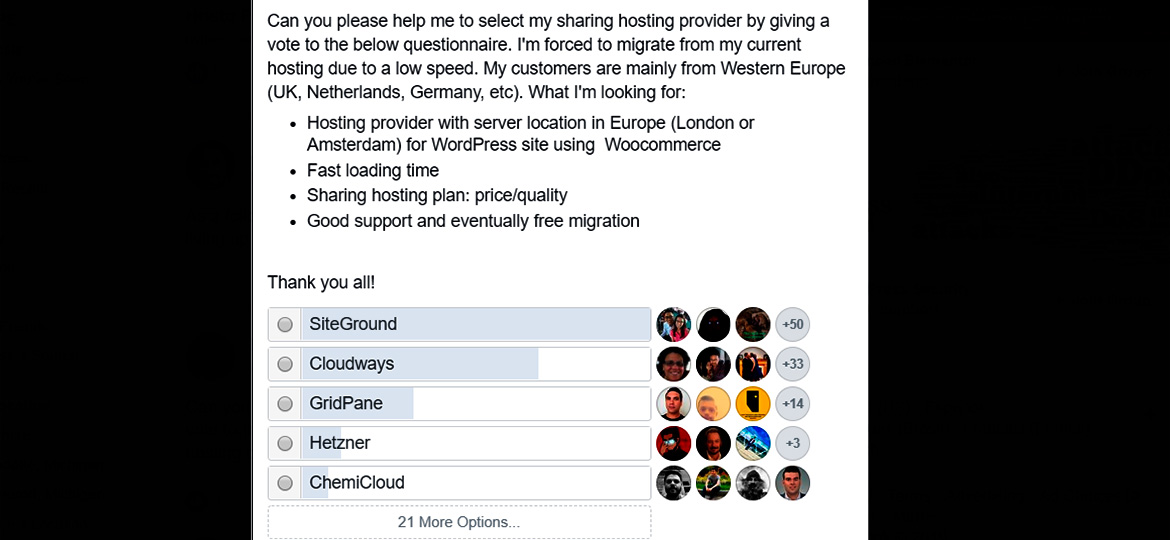
It doesn’t matter who you are. Every Company is going to have a mix of good and bad customer experiences. Still, SiteGround Continues to impress the overall majority of WordPress Users. See for yourself.

Engineered for Speed
In my personal experience, I found SiteGround very fast especially with the SiteGround SuperCacher and built-in Cloudflare CDN. These features help your site load faster by caching static content and delivering it over a network of over 100 servers worldwide.
When someone visits your website, the content is delivered via the closest server. This result is a better google page rank as well as happy visitors to your site.
Clean Intuitive Interface with One-Click WordPress Installation and Staging
You will also find the back-end interface to be very intuitive and easy to navigate. They offer one-click WordPress installations that’s super easy to use. They also offer One-Click WordPress Staging in some packages.
This allows you to create a copy of your live website in a separate staging environment. This way you can experiment and test changes prior to making them live on your website. When you’re ready to publish those changes, again, it’s one click! That’s pretty nice!
Great Customer Service and Support
Support is excellent with live chat, ticket submission, and phone. I’ve used the support system and have always found knowledgeable parties on the other end. Usually, within minutes you will have someone eager to help you solve any issues you are experiencing. Don’t overlook this because when you are actually having issues it’s really nice to have a company that helps its users.
Built-in integration to enable FREE SSL certificate from Let’s Encrypt
https vs http – Up until about 2017, this used to be sort of optional. If you had a website that was selling something, involved a shopping cart, or asked visitors to enter sensitive information you needed it. If not, then you might not bother.
But today is different. If you are not using https protocol you will encounter several issues.
First, Google Chrome now displays a “not secure” warning on any website not using https protocol. This is regardless of whether or not you are collecting any sensitive data. You can see how someone might mistakenly think your site is unsafe and abandon it altogether.

Second, Google announced that they do take into account https protocol when ranking your site in search results. This alone should make you want to be certain that SSL certificates are enabled across all of your websites.
Third, everyone else is doing it and if you’re not, you’re going to stand out but not in a good way. People have come to expect to see that little padlock in their browser window. They equate it with trust and confidence in you and your business. Don’t let their first impression of you and your business be one of uncertainty.
Popular Alternatives you might research: Bluehost, Dreamhost, HostGator, GoDaddy
Was this post helpful in learning how to buy a domain name and web host?
Please share your experience in the comments below!
Next Post: How to Point a NameCheap Domain to SiteGround Hosting – If you decided on an alternate domain registrar or hosting service the steps will be similar but please check with your provider for specific instructions.
Best Books on WordPress and Blogging


Leave A Comment